Search for Web 2.0 Tools

Tuesday, August 20, 2013

Technology Integration Ideas: Week 3

  • Create Smartboard Categorization activies
    1. If you haven't given the Smartboard Notebook's activity builder you should see how simple it is to create an activity that will help students with sorting and categorizing data, words, numbers, and images.  Very simple and yet a powerful tool.
  • Smartboard Matching Game
    1. Here is a tutorial on how to quickly create a matching game using the Smartboard Notebook software.
  • Take your bookmarks everywhere
    1. This tutorial will demonstrate how to use myLinkCloud which is a neat site that allows you to take your bookmarks/favorites with you everywhere.  Use your phone, laptop, or desktop to access your favorite websites from any device.

    Sunday, August 11, 2013

    Tech integration ideas in case you missed them earlier.

    Now that school has started I thought I would create a new letter for my staff on different tech integration strategies and ideas.  I have already blogged about them, but in case you missed some of the great tech tips and tricks here is my second news letter.

    1. Jeopardy game:
      1. I was asked by a couple of teachers how I play Jeopardy with my classes.  I have tried all sorts of PowerPoint and Smartboard ideas, but the best that I have come across is Jeopardy Labs.  You can have up to 12 teams, creating questions has never been easier and the points work out quite well to keep track of who is ahead.
    2. Instant Countdown Clock
      1. This is something I just ran into.  You can easily use Google search to create an instant countdown clock.  Use it to keep track of your timed activities in class.
    3. Geography Game:  Where in the world am I?
      1. I also just ran across this site.  It place a area from Google maps street view.  Your goal is to see how close you can come to guessing the location.  You can move around the picture looking for location clues such as writing, building types, clothing, vehicles, scenery, etc...  The closer you get the more points you will receive.  Have your students compete in groups to see who can come closest.  A game consists of 5 locations.
    4. Smartboard Tips and Tricks
      1. Here is a page with detailed tutorial on Smartboard tips and tricks that might make your life easier when integrated Smartboard into the classroom.

    If you have any other questions or tech ideas you want incorporated into this news letter please let me know.

    Saturday, August 10, 2013

    Interactive Website: Play a neat little geography game using GeogGuessr.

    GeogGuessr is a great geography game.  Your students will view an image found on Google Earth/Maps.  Using clues such as the surrounding foliage, landscape, culture, buildings and languages found on signs students will have fun trying to guess the location.  They will try 5 locations.  The closer they are to the location the more points they will receive.  Try playing this game with student groups and see which group has the best knowledge of the world's locations.

    Tutorial

    1.  Go to:  www.geoguessr.com

    2.  You will now see the location that you are supposed to guess right away.


    3.  Off to the right you will see a mini Google map.  Using your mouse's scroll wheel, zoom in and out of the map. 


    4.  One of the awesome features is that you can actually move through the map looking for context clues.  Find that writing, vehicle type, or house that might give you a clues as to where in the world you are.


    5.  Once you think you know where you are at, click on that location to drop a Google marker.  Then click the "Make a Guess" button.


    6.  It will now draw a line for your guess to the actual point.  You can see that I was fairly close and yet so far away.  At the top of the popup map that you will get, you can see how many points the game gave you.  Close that window by clicking the small "x".  You should now see your second location.  Repeat the steps.


    7.  Once you are finished with all of your guessing you will get a display of all the distances and your total points.  Have your students compete in groups or rows, to see which group can get the most points.


    8.Once you are finished you can also share that game and even challenge somebody else to see if they can beat your score.


    Give GeogGuessr a shot.  I think this activity would be great to try at the beginning of the class period as an opening exercise when teaching Geography.  Happy hunting.

    Monday, August 5, 2013

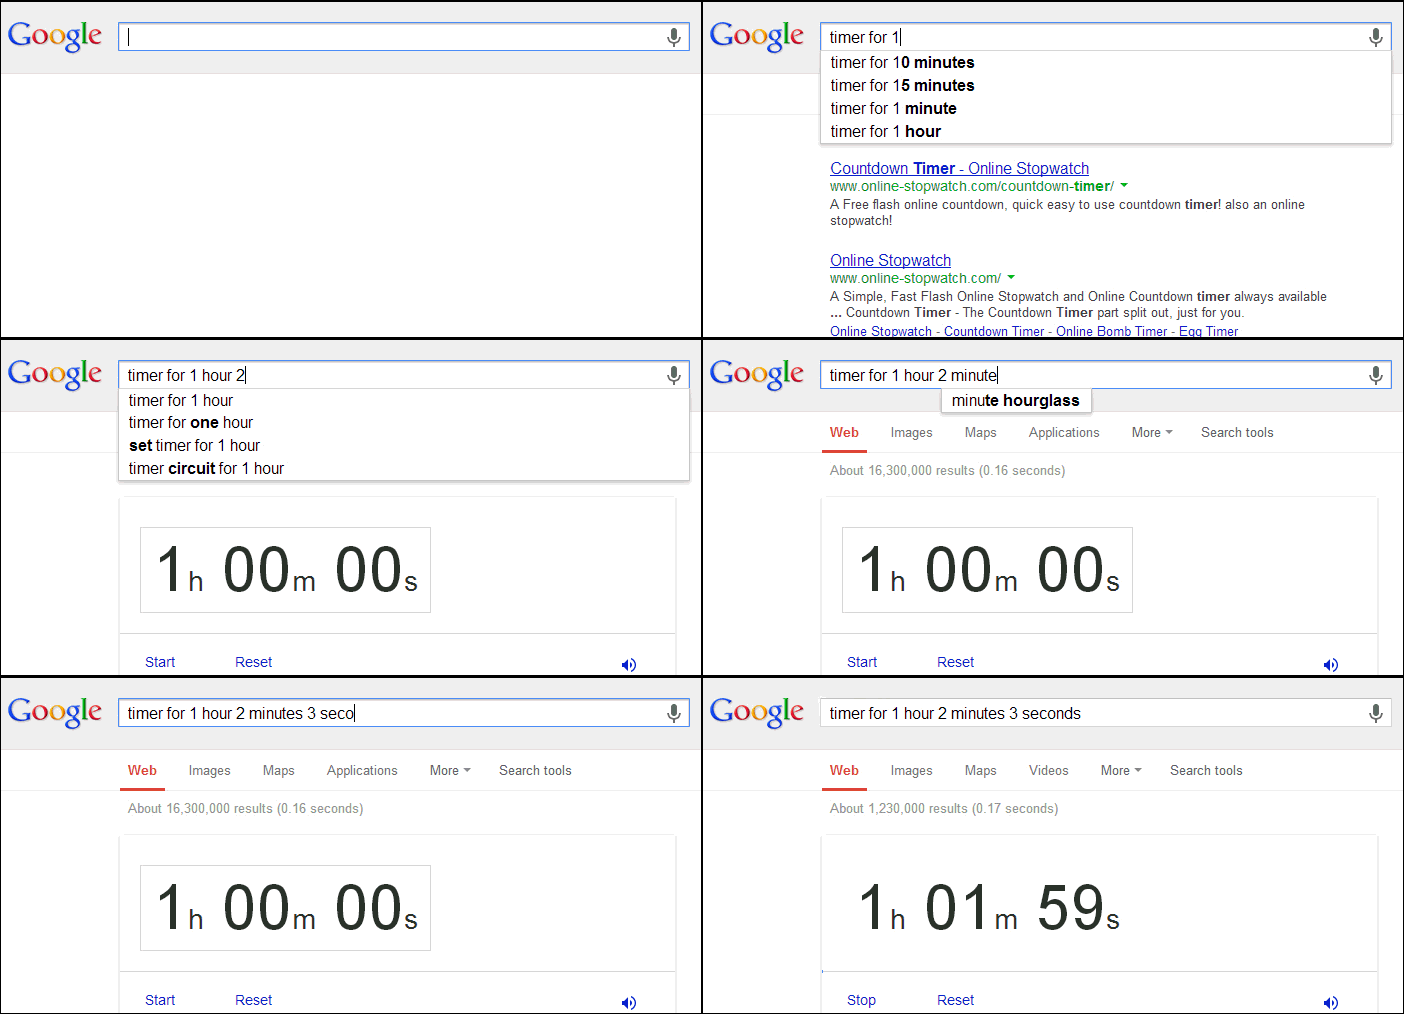
    Google Search: Create an instant countdown timer using Google Search.

    I love this Google tool.  I wish I would have seen it sooner.  Google, though now has a timer.  It is extremely easy to use and within a second you can get a timer ready for your students.  I plan on using this to moderate my lesson plan times this year.

    Tutorial

    1.  In your browser using www.google.com, all you need to do is start typing a timer phrase using the word "Timer."  Hit enter and your timer begins a count down.  You can stop it, reset it, mute and unmute the sound. 


    2.  If you are using Google Chrome, all you need to do is type the timer phrase in the URL address box, hit enter and your timer will appear and begin to count down.  There is an example below.


    Definitely cool stuff.  Next time I have to give a Standardized text, I am using this time.  Comment below to let the community know how you are using online timers in your classroom.

    Sunday, August 4, 2013

    BEWARE: Ammyy.com Scam

    Every once in a while I have a technical experience I like to share.  The following on just happened moments ago.
    I just received a phone call about how my computer is having extreme issues.  I told them they were crazy but I was curious so I followed along.  They will take you into your computer and show you errors that have come up and then try to convince you that you need to log into a website so they can clean out your computer.  Do not follow them.  In then end after I Googled the conversation and told them they sounded like a scam they hung up on me.  So I am just giving you a warning.  These guys even said they were from Microsoft and sounded legit.
    After doing some research, I found that this isn't a new scam.  It has been circulating since about 2010.  At least that is the oldest date I could find.   Many people get taken by computer scams every year, so I just wanted to warn my readers that it is still circulating.

    The website they are trying to send you to is ammyy.com .  Now Ammyy.com is a legitimate site for sharing your desktop with people.  Just don't use them to share with these scammers.

      Beware!!! Remember to talk to a IT professional that you know, before giving information out over the phone and email.  None of the big companies out there will call you or email you out of the blue and ask for information.

    Friday, August 2, 2013

    Google Forms: Add attachments to your Google Forms.

    Google forms is a great tool as it stands.  You can use forms to give surveys, mail/document merging, and just gathering information from students, parents and staff members.  The one major flaw with Google forms is that as of right now you can't add attachments.  As an educator you might want to collect assignments as part of a survey or questionnaire.  This has been a major frustration for those who use Google everything like me. 

    I was asked by my district to come up with a way in which we can fill out a form with information and then gather a document needed.  We have tried many form building sites that did what we needed.  In the field of education though, we are always looking for the free or super cheap option.  Today I came across that solution.  I can't believe I haven't found it before, and that is formpl.us or Form+.

    Advantages of using formpl.us
    • Add attachments of course.
    • Ties in with Google forms and Spreadsheets, with your Drive all together.
    • Display it on your site, via email, or Facebook
    • Receive email notifications when a form is submitted.
    • Drag and drop elements in seconds onto your form.

    Tutorial

    1.  Go to http://formpl.us

    2.  Click the "Login with your Google account" button.  If you are part of my district make sure you are already logged into your Gmail account.


    3.  You will then have to give Form+ permission to access your Google info.  Click the "Accept" button.


    4.  Give your form a title and click "Save."


    5.  Start by dragging elements to the big box on the left hand side.  If you want a text box, left click and hold, then drag it onto the canvas.


    6.  Click the "File Upload" tab to get your button that allows for attachments.  Just drag it onto the canvas.


    7.  If you want your users to have different options to choose from use the tab, "Checkbox/Radio."


    8.  Here are all the options you get if you want text boxes.


    9.  You can also use the "Select" tab to get dropdown menus.


    10.  If  you want to start with pre-made forms just click the "Form Templates" tab at the very top of the scree.


    11.  The picture below is a sample of a complete form for submitting resumes.  Once you are satisfied with your form, click the "Create Form" button.


    12.  You will now be able add some form options such as when the form needs to be submitted by, email notification options, and you can even limit the amount of submissions.  Once you have made your choices click the "Set Form Options" button.


    13.  The option for Email Notifications that I would use is the "Upon Submission."  You could however turn off your email notifications or even just send one email message on a daily basis.


    14.  Off to the right now, you have "Direct Links" which will let you copy and paste the link so that you can sent your form via email.  You can also Facebook, Tweet, and Google Plus your Google form.  You can also add your form to a website using the "Display on your site" option.  Click either "Pop-up" or "iFrame" in order to get the code.


    15.  Just copy and paste the code into the HTML section of your Blog or Website.